

Publish to your own domain
You’ve briefed an Agent, it built you something worth showing off - a landing page, a dashboard, a report you’re proud of. Sooner or later you’ll want the result to live somewhere that looks like you - to share it with your own URL.
Where to find it
Section titled “Where to find it”To Publish your work:
-
Open the Task you want to publish
-
Scroll down to the bottom of the Task overview
-
In the Attachments section at the top, click Publish
The panel that opens is the same one you’ll use for both flows below - the quick web link, and your own domain
Quick publish to the web
Section titled “Quick publish to the web”Inside the Task, open the Publish panel and check Publish to the web.
That’s it. Cluing gives you a permanent link - anyone with it can open the result, no Cluing account needed. It stays live until you uncheck the box.
Step 1 - Publishing to your own domain
Section titled “Step 1 - Publishing to your own domain”If you’d rather serve the result from a URL you control - reports.yourcompany.com, dashboard.yourcompany.com - you can do that from the same panel.
Two things need to happen:
-
enter your domain in Cluing
-
add two records at your DNS registrar
Enter your Domain
-
Open the Task and click Publish.
-
Under Your own domain, type the domain or subdomain you want to use
-
Click Connect. Cluing shows you two DNS records - leave that tab open
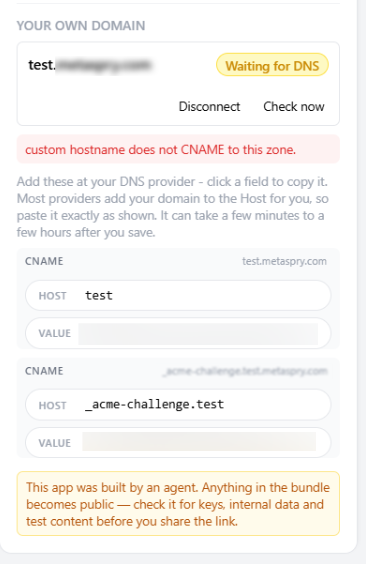
Step 2 - Add the two DNS records at your registrar
Section titled “Step 2 - Add the two DNS records at your registrar”Open your DNS provider (Cloudflare, Namecheap, GoDaddy, Google Domains - wherever you bought the domain) and add the two records Cluing showed you. Copy each value exactly.
Come back and confirm
Section titled “Come back and confirm”Once Cluing sees your DNS records, your domain lights up as verified and the Task result goes live at your URL.
Unpublishing
Section titled “Unpublishing”Uncheck “Publish to the web” and it’s gone - same for a custom domain if you’ve connected one. No confirmation dialog, no delay. Change your mind and switch it back on whenever.